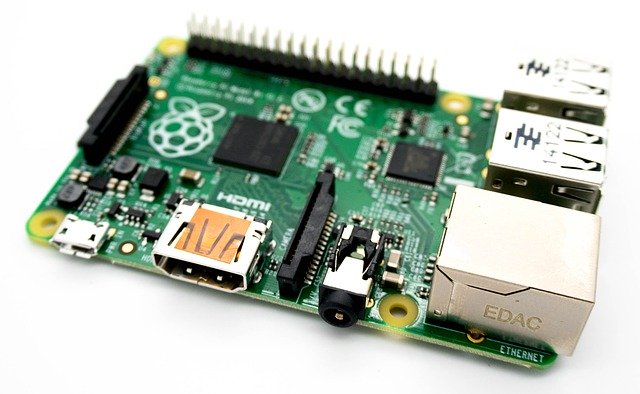
The COVID-19 situation put a strain on all of us in many ways. Fun distractions were one means of weathering the strange circumstances. This post is devoted to a fun project that provides just such as distraction. The project resurrects old programming skills (alas, not COBOL) to build a solution on a Raspberry Pi platform.
While at home during lockdown, we had a number of people in our home. More people than we had garage door openers. A reasonable solution would be to get a remote keypad or just use the front door. But to do something interesting, I decided to open my garage door using my phone. Separately, I noticed that Visual Studio 2019 Community Edition includes a Raspberry Pi sample project. I was intringued. Did Microsoft really acknowledge the existence of such a small platform? More so, does it even proport to support it some way? I had to find out. So, I concocted an unnecessarily complex solution to use a Raspberry Pi to control a garage door opener. The software side would be built using the newly discovered Visual Studio 2019 sample project, deployed to a Raspberry Pi Zero W with a minimal custom hardware adapter.
Requirements
The requirements are simple – open the garage door using my phone. The solution must be secure. Ideally, use a one-time password or some form of two factor authentication. I don’t own a Mac so it won’t be possible to create a native iOS app. But I could create a web page.
Solution
The solution is to use a Raspberry Pi running a web server. The web server will be used to send a signal to a relay via the GPIO interface. The web application will implement features to keep the solution secure.
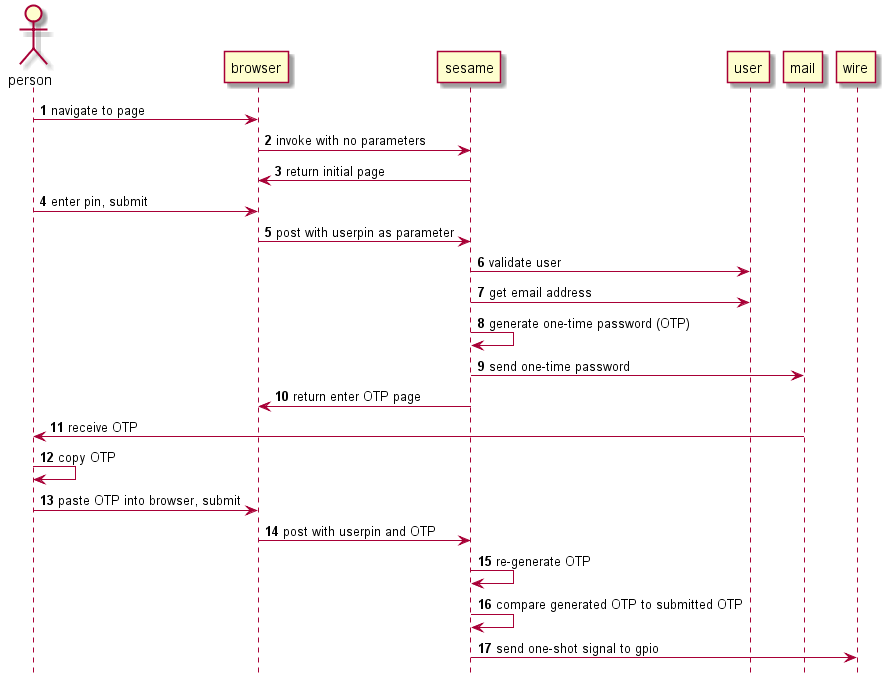
The user will navigate a local browser to an initial web page. The web page will accept a pin number that uniquely identifies the user. Upon submitting the pin number, the web application will generate a one-time password (OTP) and email it to an address associated with the pin, then display a page to accept the OTP. The user will receive the OTP via an email client and copy the OTP to the web page. Upon submitting the OTP, the web application will generate the same OTP again and compare to the one supplied by the user. If the two OTP’s match, the web application will signal the relay to trigger.
Setup your Workstation
Get Visual Studio 2019
Download Visual Studio 2019 from https://visualstudio.microsoft.com/downloads.
Using VS 2019 Community Edition to target the ARM architecture using C/C++. I started with the sample project called “blink”. The blink project uses OpenSSH to send the source files to the target machine, and compiling remotely. Additionally, it uses the debugger server, gdb_server, which allows for remote debugging. All that means you can write and debug code for Raspberry Pi from the comfort of your Visual Studio environment. Though I’ve not tried it personally, it appears that all the interfacing between Visual Studio and the remote computer is high-level through OpenSSH and command lines. The result is that you can target other Linux platforms that have the same toolchain (e.g. Ubuntu, Windows Subsystem for Linux, Azure Sphere OS).
I found a couple of helpful Microsoft articles to get started with using Visual Studio with Linux:
Setup a Secure Shell Client
There are several options to use secure shell from Windows 10 to the Raspberry Pi.
Microsoft now includes a secure shell client with Windows 10. To use the secure shell client, open a Command Prompt and enter:
>ssh pi@your-hostname
Alternatively, you can use a third-party secure shell client. I use PuTTY to connect to the Raspberry Pi from the Windows desktop.
PuTTY can be downloaded from https://putty.org.
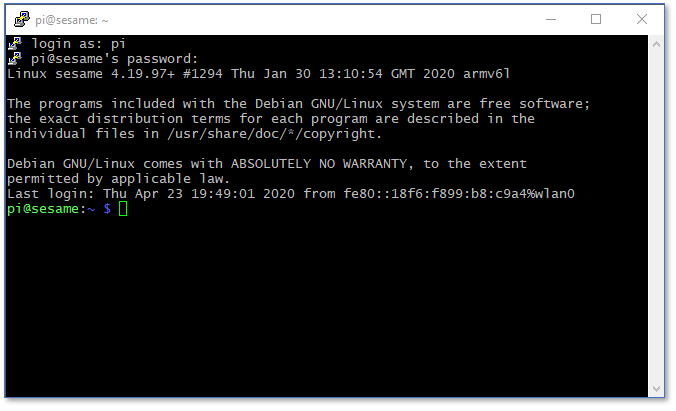
You may want to tinker with the font selection as the default appears a bit blurry. Or maybe it’s just me.
Setup Your Raspberry Pi
The solution is developed on a Raspberry Pi Model 3B and deployed on Model Zero W. Start with a clean Raspian installation. For installing a fresh Raspian copy on your Raspberry Pi, check out How to Install Raspian for the Raspberry Pi. I used the Raspberry Pi Imager for Windows.
Initialize your Pi
The Raspian setup wizard will help you
- Set your regional information
- Change your password
- Connect to the network
- Download and apply updates
Once these steps are out of the way, you can get on with configuring the Pi for the solution.
Update the Configuration
From the Desktop, select the Raspberry -> Preferences menu and choose Raspberry Pi Configuration.
Change your Hostname
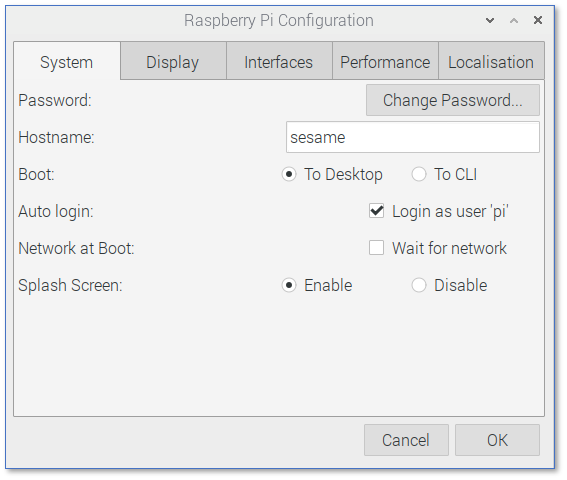
I gave my device the hostname “sesame”. You may call it whatever you like.
Enable Secure Shell
Secure shell is used to access the Raspberry Pi remotely. Enable secure shell (SSH) via the Raspberry Pi configuration tool.
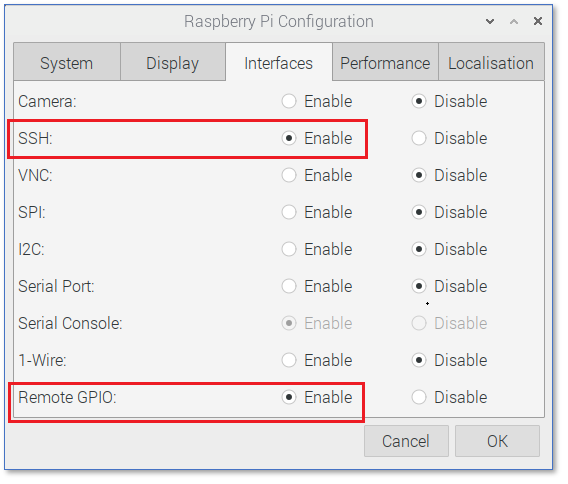
OpenSSH, an open source tool that implements an SSH client, will be used to develop the software and access the Pi remotely.
Assign a static IP Address
Depending on your network, you may be able to consistently access your device by hostname even with a dynamic IP. To be safe, assign a static IP. Check your router’s IP range to choose and address that won’t get assigned.
Open a Secure Shell Connection
Using your preferred SSH client, open a connection to the device as the pi user.
Install Apache Web Server
The solution uses the venerable Apache 2 web server. I tried others like NGINX and Lighthttpd but could not get the configuration to work. Apache was simple and worked right away.
Once logged in via a secure shell session, you can install Apache. To install Apache, run the command:
$sudo apt-get install apache2
I found that after running the above command, Apache was pretty much ready to go. To check it out, open a web browser and navigate to http://your-hostname. You should see a page that looks like:
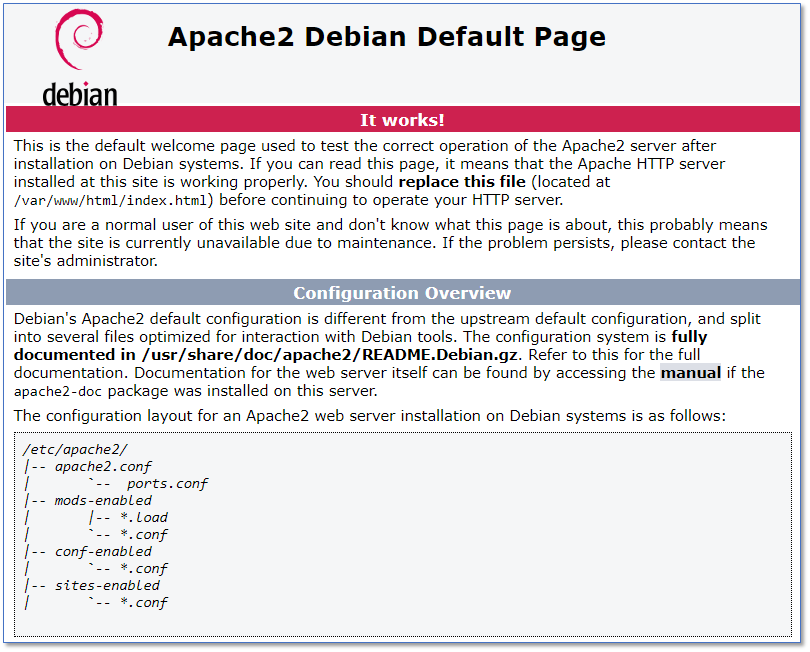
If you don’t see the above web page, check out the installation steps from https://pimylifeup.com/raspberry-pi-apache.
Configure CGI
This is the 1999 part. Really, it’s more like 1996. I have not done CGI programming since before Java was released. This was a real throwback. But, coding in CGI using C is great fun in its simplicity.
To enable CGI, execute the following:
$ cd /etc/apache2/mods-enabled
$ sudo ln -s ../mods-available/cgi.load cgi.load
$ sudo service apache2 restart
To check that it’s working, try creating a small Perl script and browsing to it. Change into the cgi-bin directory:
$ cd /usr/lib/cgi-bin
Edit a new file:
$ sudo vi hello.cgi
Add the following code:
#!/usr/bin/perl
print "Content-type: text/html\n\n";
print "Hello\n";
exit;
Save the file (Escape key, hold down Shift and press Z Z).
Set the execute permissions on the file:
$ sudo chmod +x hello.cgi
Open a browser and navigate to
http://your-server-name/cgi-bin/hello.cgi
The browser should return “Hello”. Otherwise, troubleshoot if there is an error.
Configure SSL
The solution uses SSL to secure data in transit. I found a helpful article at https://variax.wordpress.com/2017/03/18/adding-https-to-the-raspberry-pi-apache-web-server
After completing the steps from the above post, I found a few additional steps were needed in order to get SSL to work:
Change into the /etc/apache2/mods-enabled directory:
$ cd /etc/apache2/mods-enabled
Next, add the SSL modules to the mods-enabled folder:
$ sudo ln -s ../mods-available/ssl.load ./ssl.load
$ sudo ln -s ../mods-available/ssl.conf ./ssl.conf
$ sudo ln -s ../mods-available/socache_shmcb.load  ./socache_shmcb.load
Restart the Apache service:
$ sudo service apache2 restart
You can now browse to
https://your-server-name
Note that the certificate will need to be imported into your machine’s certificate store in order to eliminate the warning messages. This aspect of the solution needs more work. It may be worth getting a legit certificate from a regular CA.
Install SSMTP Mail Components
The solution uses smtp mail services. Check out the article at https://raspberry-projects.com/pi/software_utilities/email/ssmtp-to-send-emails for info on setting your device to send email.
Note that gmail did not work out so well because Google thought its outbound emails were a security threat. You mileage may vary. It would help to create a new email account dedicated to sending email from the device.
Connect a GPIO Breakout Cable
I used a breakout cable and a breadboard to prototype the electronics. If you’re using a Pi Zero, you’ll need to solder the 40-pin header to the system board. If you haven’t soldered in a while, you might want to practice or take a look at some youtube videos.
Software Design
The software is designed as a 1996-era web program.

A person browses to a CGI program URL, enters data and submits to the same CGI program. The CGI program detects its own program state and controls outputs to the GPIO interface.
State Machine
The CGI program generates one of two possible HTML forms. THe first form submits the user pin. The second form submits the one-time password. Application state is determined by what form invokes the CGI program.
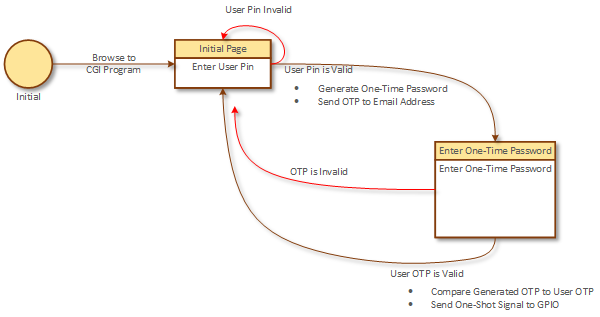
All of the work happens on the edges. When the user submits the user pin, the CGI program validates the user pin, generates a one-time password, and sends out the OTP to the email address associated with the user pin. When the user submits the one-time password, the CGI program validates the password and sends a signal to the GPIO interface via the WiringPi library.
If at any time there is a validation failure, the application returns to the user pin submission form.
Sequence Diagram
The overal program life-cycle follows the sequence diagram below.
CGI Program Modules
The CGI Program is a compiled executable that is broken down into several modules.
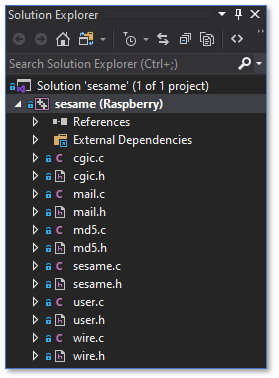
Sesame Module
The Sesame module implements the main program behavior. The top-level function, cgiMain(), is called for each post. It is up to the cgiMain() function to determine program state from the available inputs.
/*
called from the cgic library
*/
int cgiMain() {
 /* send the top of the page*/
  sesameHandleHeader();
/* check if the user is submitting a pin */
if (cgiFormSubmitClicked("submit_userpin") == cgiFormSuccess) {
    sesameGetUserPin();
    if (!sesameIsValidUserPin()) {
      sesameShowPinError();
      sesameShowPinForm();
    }
    else {
      sesameGenOTP();
     sesameSendOTP();
     sesameShowOTPForm();
   }
  }  /* check if the user is submitting their one-time password */
  else if (cgiFormSubmitClicked("submit_userotp") == cgiFormSuccess) {
    if (!sesameCheckOTP()) {
      sesameShowOTPError();
    }
    sesameShowPinForm();
  }
  /* otherwise show the pin input box */
 else {
    sesameShowPinForm();
 }

  /* Finish up the page */
  sesameHandleFooter();
  return 0;
}
CGIC Module
CGI programming has been around practically since the dawn of the world wide web. I figured surely someone has written a descent C library for accessing CGI variables and handling events. I found the CGIC library at https://github.com/boutell/cgic. It has been around for a long time and deals with the tricky stuff of parsing STDIN for HTTP-POST variables and such. The CGIC library includes a main() function, which in turns calls an application-implemented function called cgiMain(). The cgiMain() function is meant to be the entry point to your application. In UNIX fashion, CGIC just references cgiMain() counting on the fact it will be statically linked; you do not need to register a callback function or configure anything. I’m sure there’s a downside to this approach, but I reveled in its elegant simplicity.
User Module
The User module manages access to the user list. The user list is stored in a simple text file located at
/etc/sesame/sesame.txt
The sesame.txt file is a comma-separated file that lists the users and their email addresses.
To create the file, navigate to the /etc folder
$ cd /etc
Create the sesame folder
$ sudo mkdir sesame
$ cd sesame
Create the sesame.txt file
$ sudo vi sesame.txt
Enter the usernames and email addresses. You can create a special user called admin. The admin user will receive an email each time the sesame program is successfully activated. Your file should look something like this:
admin,someone@domain.com
jimmy,another@domain.com
Alternatively, you can send email to SMS recipients. In other words, you can send an email as a text message to a cell phone. For example, if James uses AT&T, the entry would be:
james,wirelessnumberforjames@txt.att.net
Check the email domains for other providers’ email to SMS service.
Save the sesame.txt file.
The sesame contains sensitive information. Plus, if someone were to hack into your device, they can add a username and email address for themselves. To prevent that:
Change the file’s group as the user account under which the Apache web server runs, www-data:
$ sudo chgrp www-data sesame.txt
Next, change the permissions on the file so that only root can edit the file and the www-data group has read-only access to the file. No one else can edit or view the file.
$ sudo chmod 640 sesame.txt
This is only so-so security. In practice, many more steps should be taken to encrypt the data and ensure that is has not been tampered with. But that is the difference between a toy and a product.
MD5 Module
The OTP algorithm is based on the user pin and time of day in two-minute intervals.
I started with an MD5 hash available on GitHub:
https://gist.github.com/creationix/4710780
Since it was implemented as a stand-alone program, I modified so that it can be used more like a library.
Mail Module
The solution uses the external mail service to send the one-time password. I followed the instructions at https://raspberry-projects.com/pi/software_utilities/email/ssmtp-to-send-emails to install the ssmtp service and mail utilities.
Wire Module
The Wire module wraps the WiringPi library. WiringPi is very simple to use & makes the GPIO work more like an Arduino.
By default, GPIO can be accessed only by root or users in the gpio group. The Apache runs as the user www-data. To enable GPIO access from the Apache process, add the www-data user to the gpio group and restart the service:
$ sudo usermod -a -G gpio www-data
$ sudo service apache2 restart
Build the Software
Retrieve the Software from GitHub
The source code can be found at https://github.com/dataventure-io/sesame. Open the solution in Visual Studio.
Configure Visual Studio to connect to the Raspberry Pi
See the article https://devblogs.microsoft.com/cppblog/linux-development-with-c-in-visual-studio for setting up Visual Studio’s connection list.
Build the Software
In Visual Studio, select the Build menu and choose Rebuild Solution. You should see an output window similar to:

The build process will transfer the source files to the remote computer, invoke the compiler and linker, then copy the executable to the target location.
If you do not see any errors, you can check that the sesame.cgi file was copied to the cgi-bin folder:
$ cd /usr/lib/cgi-bin
$ ls -la
total 100
drwxr-xr-x 2 root root 4096 May 6 00:22 .
drwxr-xr-x 75 root root 4096 May 6 18:16 ..
-rwxr-xr-x 1 root root 80 Apr 29 17:08 hello.cgi
-rwxr-xr-x  1 root root 89852 May  6 18:48 sesame.cgi
Check that you can browse to the sesame program:
https://your-server-name/cgi-bin/sesame.cgi
You should see a web page that looks like:

If you’ve created the sesame.txt file and completed all the configuration steps, you can give it a whirl. Enter your user pin and click Submit. You should see a one-time password in your inbox.
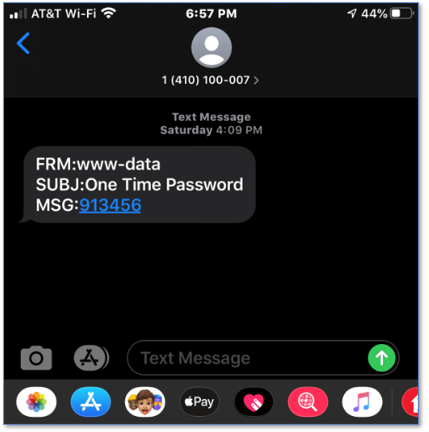
In the above example, I chose to send the one-time password to my mobile phone via email to SMS.
Hardware Design
The hardward portion of this solution is a truly humbling experience. In retrospect, I perhaps should have just purchased a relay adapter. Instead, I chose to design a very simple adapter that would close the garage door button circuit.
Relay Adapter
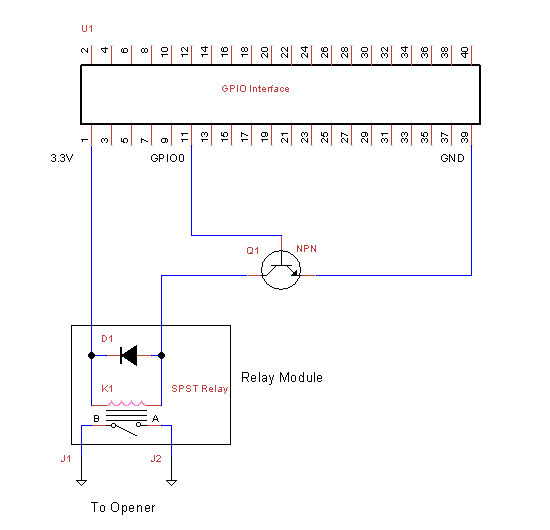
The software sets the GPIO pin 11 (Wiring Pi pin 0) to high (2.2 volts) when activated. The voltage is not enough to drive the coil in the relay. Therefore, we borrow the 3.3V output from pin 1. The transitor Q1 switches the relay on and off by connecting the ground to the other side of the coil. The relay included a diode which prevents current from flowing backwards into the GPIO interface.
Parts List
| U1 | GPIO Interface |
| Q1 | 9414 NPN Transistor |
| D1 | 1N4148 Flyback Diode |
| K1 | 3S-KT relay, 3VDC / 100mA Input, SPST NO Output |
| J1, J2 | Connectors to Garage Door Opener |
Final Assembly

I’m definitely not going to get any calls from Jon Ivy on this. The relay was pre-soldered onto a small printed circuit board, which did not include pins. This made the final assembly a bit more awkward as the relay just floats over the main board. The board itself is connected to the Pi Zero using a 2×20 pin header.
Conclusion
The main concern with the implementation is security and safety. Safety can be achieved in pretty much the same way that it works today – don’t access your garage door without seeing it. Security was another matter. The one-time password solution works, but it is a bit clumsy. Not good when you’re in a hurry.
This was a fun project. I learned a great many things about the Raspberry Pi and I got do some nostalgic programming.
From a safety standpoint, use the following best practices:
- Change the admin password on your router
- Hide your network’s SSID
- White-list the MAC addresses of your devices
- Only operate this solution when you have line-of-sight on the garage door.
I strongly discourage implementing this solution if you’re using any technology that makes your home network accessible from the Internet.
